Origami Cube, Patsy Wang-Iverson Version
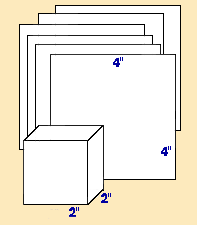 |
What Do You Need? What Will You Get? If you are making the cube in a workshop, the number of sheets required to make a cube follows easily from a discussion of characteristics of a cube. One then might ask "Starting with 4" square paper, what will be the dimensions of the final cube?" This very neat cube requires 6 sheets of square paper with each side double the length of the desired cube's edge. This means that if you desire a 2 inch by 2 inch by 2 inch cube, you must begin with 6 sheets of square paper which are 4 inches by 4 inches. |
 |
The Strategy. You will create 6 identical folded "tables" which have a square "table top" and stand on 2 wide "legs." These are folded together so the "table tops" are the cube's faces and the "legs" are the tabs that fold inside the cube to keep the cube tight. |
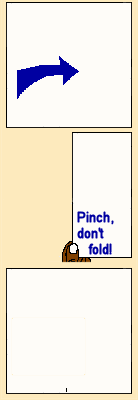 |
1. Mark the Middle of One Edge with A Measured Pinch. Place, DO NOT FOLD, one edge as accurately as possible against the opposite edge and hold the edges together briefly. Pinch, DO NOT FOLD, the middle of the one of the other edges to mark the midpoint. Open the paper. |
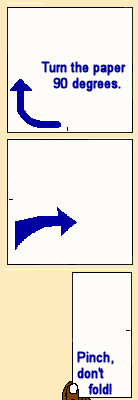 |
2. Rotate the Paper 90°, Repeat the Process to Mark the Middle of Another Edge. Rotate the paper 90 degrees so you are working with different edges. Place, DO NOT FOLD, an edge as accurately as possible against the opposite edge and hold the edges together briefly. Pinch, DO NOT FOLD, the middle of the one of the other edges to mark the midpoint. Open the paper. (This is not shown in the figure at the left.) |
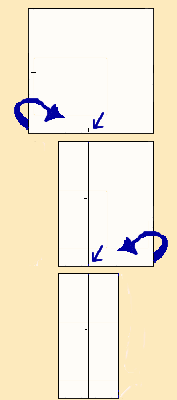 |
3. Use the Marked Middle to Fold the Sheet at the Quarters. DO NOT FOLD THE MIDDLE OF THE PAPER. This time you CREASE sharply. Fold an edge to the middle of the paper using the marked middle as your guide. Repeat the process with the other edge, again using the middle as a guide. Open the paper. (This is not shown in the figure at the left.) |
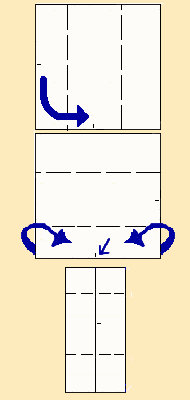 |
4. Rotate the Paper Back 90°. Repeat the Process to Fold the Sheet at the Quarters. Rotate the paper 90 degrees so you are working with the other marked middle. DO NOT FOLD THE MIDDLE OF THE PAPER. This time you CREASE sharply. Fold an edge to the middle of the paper using the marked middle as your guide. Repeat the process with the other edge, again using the middle as a guide. This time you will not open the paper. |
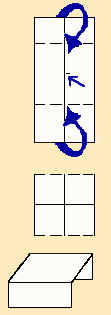 |
5. Fold the "Legs" to Create the "Table." Fold the other edges, the ones which have not just been used, to the marked middle to create a "table." Repeat the first 5 steps to create a total of 6 "tables with wide legs." |
 |
6. Keep "Table Tops" on the Outside and "Legs" on the Inside and Weaver the Cube. In a workshop, Patsy believes in letting students struggle and figure out for themselves how to assemble the cube. If your not in a workshop, these instructions will do. Turn a "table" upside down, legs up, to act as the bottom of the cube. Place two other "tables" around the outside of the "table's legs" keeping "tables" on the outside and "legs" as tabs on the inside of the cube. This completes 3 sides of the cube. Now the tucking begins. Notice, on the left, how a "table" is used as the top of the cube and its "legs" are tucked or slid into the inside of the cube. Place the top face on the cube by tucking the "legs" inside the cube. Turn the cube to a face in which "legs," tabs, are still showing and TUCK the next "table legs" into the cube keeping "table" on the outside and "legs" on the inside. Turn the cube and repeat the tucking for the last face of the cube. |
 | ![[MC,i. Home]](http://www.mathnstuff.com/math/spoken/here/1gif/mcihome.gif)
![[Table]](http://www.mathnstuff.com/math/spoken/here/1gif/table.gif)
![[Words]](http://www.mathnstuff.com/math/spoken/here/1gif/words.gif)

![[this semester's schedule w/links]](http://www.mathnstuff.com/gif/semestr.gif)
![[Good Stuff -- free & valuable resources]](http://www.mathnstuff.com/gif/goods.gif)
© 2012, Agnes Azzolino www.mathnstuff.com/papers/tetra/cube.htm |